Bing Ads Destination URL Auto-Tagging
A request by the Bing Ads community for Microsoft to implement auto-tagging of destination URL’s within an account received a large amount of support from users as can been seen in the request here: http://bingads.uservoice.com/forums/82363-bing-ads-feature-suggestion-forum/suggestions/1567199-enable-auto-tagging-of-destination-urls-for-analyt.
Bing Ads has now taken the request and implemented URL auto-tagging within the platform as detailed in the feature announcement here: http://advertise.bingads.microsoft.com/en-uk/blog/28521/auto-tagging-of-destination-urls-in-bing-ads.
Destination URL Auto-Tagging Explained
To effectively track the various sources of traffic to your website from platforms such as Bing Ads and Google AdWords with analytical platforms such as Google Analytics require the destination URL to have a query string appended to it which outlines the correct source and medium.
Within Google AdWords there has always been a setting that can be enabled to auto-tag the destination URL’s contained within your campaign ads. This functionality was missing from the Bing Ads platform, which left users with the task of tagging up all of their destination URL’s within their Bing Ads campaigns. Using tools such as the Google Analytics URL Builder: https://support.google.com/analytics/answer/1033867?hl=en and then appending the generated tracking string to URL’s can be a very time consuming process and also leaves margin for error and inconsistencies in tracking source and medium within Google Analytics if the strings are changed, missed, or contain different characters and capitalisation.
Enable Auto-Tagging in Bing Ads Web Interface
With the launch of the URL auto-tagging feature within Bing Ads there is now a huge reduction in the potential area for errors and also saves a huge amount of time, especially in a large campaign.
There is a very easy process to enable URL auto-tagging within a Bing Ads account which will take effect across all of the campaigns within that account.
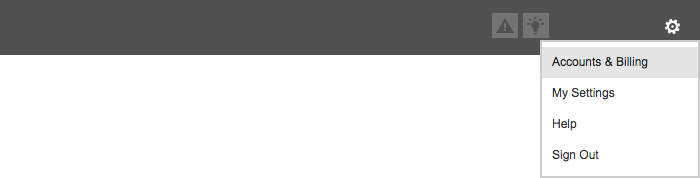
Step 1
Sign in to your Bing Ads account, then click the gear icon in the top right hand corner and select ‘Accounts & Billing’.
Step 2
Select the specific account that you wish to enable auto-tagging on, this will then display the account details page. Simply select the ‘details’ tab. Then, click the pencil icon next to the ‘Account’ subheading.
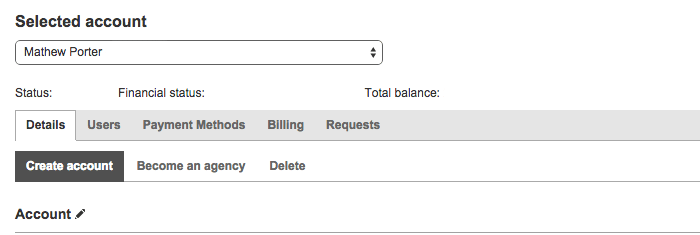
NOTE: If you a Yahoo! Managed advertiser, you will need to navigate to the ‘Advanced Settings’ tab instead, then click the pencil icon next to the ‘Account’ subheading.
Step 3
Under the ‘Account settings’ subheading there is the label ‘Auto-tagging’ with a tick box, select the tick box to enable the feature and then click the radio button for either ‘Replace all existing tags’ or ‘Keep my existing tags and add any that are missing’.

Auto-tagging will now be enabled on your Bing Ads account and all the destination URL’s contained within your Ads in Each Campaign / Ad Group.
Bing Ads Auto-Tagging Options Explained
There are two options when enabling auto-tagging within your Bing Ads account, which are; ‘Replace all existing tags’ or ‘Keep my existing tags and add any that are missing’.
Replace all existing tags – This option will ignore any Google Analytics tags / URL tracking that you have manually added to your destination URL’s in the past.
Keep my existing tags and add any that are missing – This option will leave any current tracking in place and simply add tracking to any destination URL’s that have it missing.
A word of caution! I would recommend using the ‘Replace all existing tags’ option, as some users, including myself have encountered issues with old tracking not working correctly when using the ‘Keep my existing tags and add any that are missing’ setting.
The video below also summarises how to enable this feature within your account:
All Rights Reserved © Mathew Porter 2024